


How to Build a Gaming PC for Maximum Performance: A Complete Step-by-Step Guide
Why Building Your Own Gaming PC Beats Buying Pre-Built
Building your own gaming PC delivers more performance per dollar than any pre-built system at the same price point. Manufacturers of pre-built rigs pad margins on components, often pairing a strong GPU with a weak PSU or slow RAM — choices that quietly strangle the performance you paid for.
When you build it yourself, every dollar goes exactly where you decide. You choose the GPU tier, the RAM speed, the case airflow — nothing gets quietly downgraded to protect a retailer's margin. That control compounds over time: upgrading a self-built PC means swapping one component, not buying a whole new system.
There's also the knowledge angle. Builders who understand their hardware troubleshoot faster, overclock smarter, and squeeze more FPS out of the same components. That's not a small advantage in competitive gaming.
Start With Your Performance Goals and Budget Tier
Before selecting a single component, define your target resolution and frame rate — because those two numbers determine everything else. A 1080p/144Hz build has fundamentally different component priorities than a 4K/60Hz or 1440p/165Hz setup.
Think of it in three tiers:
- 1080p high refresh rate (144–240Hz): GPU is king, but CPU speed matters more here than at higher resolutions. Bottlenecking becomes a real risk if the processor can't feed frames fast enough.
- 1440p balanced performance (144–165Hz): The sweet spot for most builders in 2026. Requires a mid-to-high tier GPU and a capable CPU with at least 6 performance cores.
- 4K gaming (60–120Hz): GPU-limited almost entirely. You can get away with a slightly older CPU without meaningful frame rate loss.
Set your total budget before pricing components. A common rule: allocate roughly 35–40% of your build budget to the GPU, 15–20% to the CPU and cooler, and distribute the rest across motherboard, RAM, storage, PSU, and case. Skewing this ratio is where most first-time builders go wrong.
Choosing the Right Components for Maximum Gaming Performance
Component selection is where your build either succeeds or quietly fails. Each part has a specific role, and the order of priority matters.
GPU — Your Single Most Important Decision
The Graphics Processing Unit is the dominant factor in gaming frame rates, full stop. In GPU-limited scenarios (which describes most modern games at 1440p and above), upgrading the GPU produces larger FPS gains than any other component change.
Look for a GPU with enough VRAM for your target resolution — 8GB is increasingly tight at 1440p in 2026, and 12–16GB gives meaningful headroom for texture-heavy titles. Check PCIe slot compatibility with your chosen motherboard (PCIe 4.0 vs. 5.0 matters for bandwidth-hungry cards).
CPU — Matching the Processor to Your GPU
A mismatched CPU creates a bottleneck — the processor can't generate game logic and draw calls fast enough to keep the GPU busy, and FPS drops as a result. At 1080p, this is where builders feel it most acutely.
For high-refresh gaming, prioritize single-core clock speed and core count (8+ cores recommended). Match the CPU socket to your motherboard chipset before anything else — an AM5 or LGA1851 platform gives upgrade headroom for the next few years without a full board swap.
RAM — Speed and Configuration
DDR5 is the standard for new builds in 2026. Aim for at least 32GB in a dual-channel configuration (two sticks, not one). Speed matters: DDR5-6000 is a practical sweet spot for most platforms, offering strong bandwidth without requiring aggressive manual tuning. Running RAM in single-channel mode costs 10–15% gaming performance on integrated graphics and still measurably hurts discrete GPU builds in CPU-limited scenarios.
NVMe SSD — Load Times and Game Streaming
A fast NVMe SSD won't raise your FPS during gameplay, but it transforms the experience around it. Games load in seconds rather than minutes, open-world streaming stutters disappear, and shader compilation completes faster. PCIe 4.0 NVMe drives hit 5–7 GB/s sequential read — more than enough for gaming. PCIe 5.0 drives exist but offer minimal real-world gaming benefit at a significant price premium.
Motherboard — Chipset and Future-Proofing
Choose a motherboard based on your CPU socket and the features you'll actually use. Higher-tier chipsets unlock overclocking, more USB ports, and additional M.2 slots. Don't overspend here — a mid-range board with solid VRM quality handles most builds better than a budget board with flashy aesthetics.
PSU — Wattage Headroom and Efficiency
An undersized or low-quality Power Supply Unit is the most dangerous mistake in any build. Aim for 20–30% headroom above your system's calculated power draw. An 80 Plus Gold or Platinum rating ensures efficiency under load. Skimping on the PSU risks instability, crashes, or — in worst cases — component damage.
How to Assemble Your Gaming PC Without Mistakes
Assembly follows a logical order that prevents rework and protects components. Work on a non-static surface, ground yourself regularly, and handle every component by its edges.
- Prepare the case: Install standoffs, route cable channels, and plan airflow before anything goes inside.
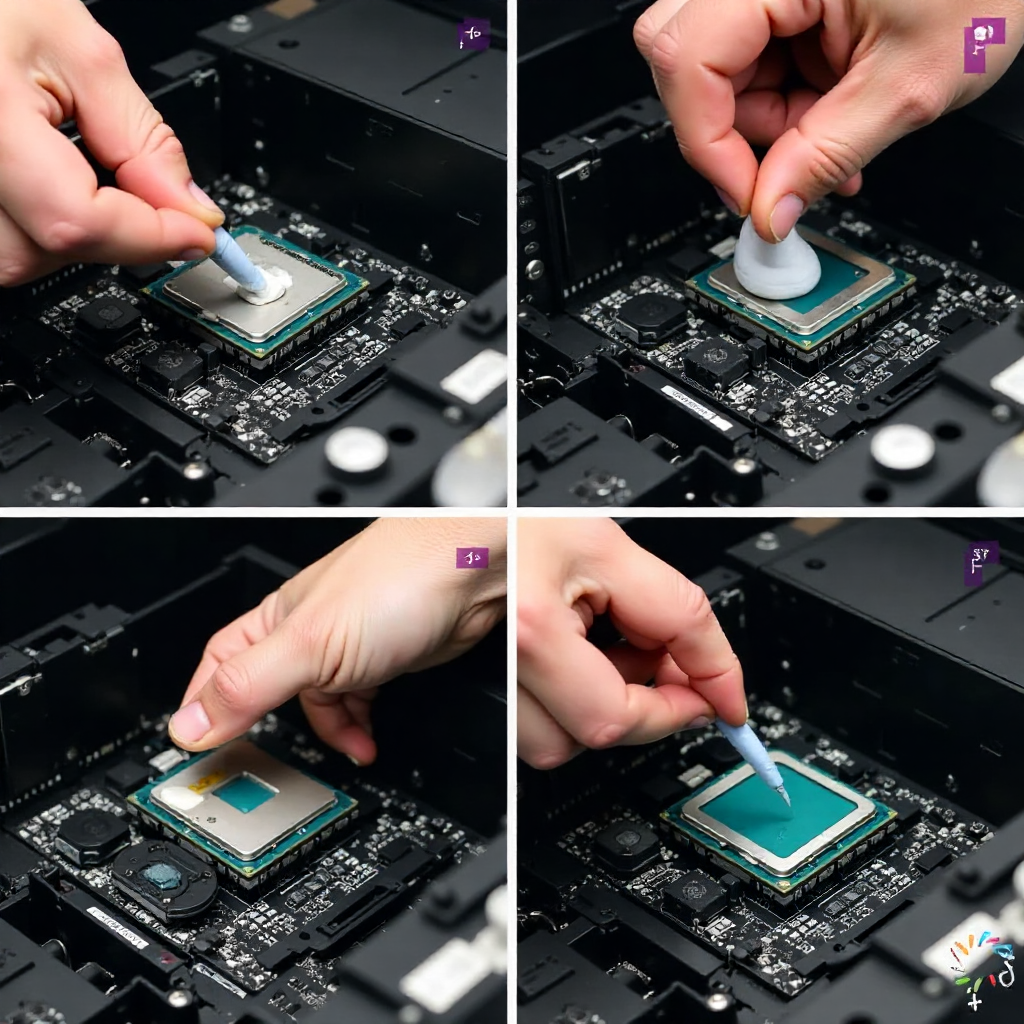
- Install CPU on motherboard (outside the case): Align the CPU notch carefully — never force it. Apply thermal paste (a pea-sized dot at center) before mounting the cooler.
- Seat RAM in dual-channel slots: Check your motherboard manual — the correct slots are usually slots 2 and 4, not 1 and 2.
- Mount motherboard in case: Secure all standoff screws evenly. Don't overtighten.
- Install GPU in the primary PCIe x16 slot: Ensure the retention clip clicks. Connect all required power connectors — a partially connected GPU power cable causes boot failures that look like catastrophic failures.
- Mount NVMe SSD in M.2 slot before closing the case — it's much harder to reach afterward.
- Cable management last: Route cables away from fans, connect front panel headers carefully using the motherboard manual as reference.
First Boot, BIOS Setup, and Driver Installation
The first boot sequence is where your hardware configuration becomes a working gaming machine — and skipping these steps leaves real performance on the table.
On first boot, enter the BIOS (typically Delete or F2 during POST). The single most important setting: enable XMP (Intel) or EXPO (AMD) for your RAM. Without this, DDR5-6000 kits run at DDR5-4800 by default — you paid for speed you're not using.
Update the BIOS to the latest stable version if your board shipped with an older one. Manufacturers regularly release updates that improve CPU compatibility, memory stability, and power delivery behavior. This takes ten minutes and prevents hours of mysterious troubleshooting later.
After booting into Windows, install GPU drivers directly from the manufacturer's website — not from the disc that came in the box. Clean install the driver package to avoid conflicts with any previous installation. Then run Windows Update fully before gaming.
Optimize Your PC for Peak Gaming Performance
Software-side optimization adds meaningful FPS and stability gains that hardware alone can't provide. These steps take under an hour and compound over the life of the build.
- Enable Windows Game Mode (Settings → Gaming → Game Mode): Prioritizes CPU and GPU resources toward the active game process.
- Disable startup programs: Background processes consume RAM and CPU cycles. Use Task Manager's Startup tab to cut everything non-essential.
- Set power plan to High Performance or Ultimate Performance: Balanced mode throttles CPU frequency in ways that hurt minimum frame rates.
- Monitor temperatures under load: Use HWiNFO64 or similar tools. GPU should stay below 85°C, CPU below 90°C under sustained gaming load. If temperatures exceed these thresholds, revisit case airflow or cooler mounting.
- Overclocking basics: Memory overclocking via XMP/EXPO is safe and easy — start there. GPU overclocking through tools like MSI Afterburner can yield 5–10% additional performance, but requires patience and stability testing. CPU overclocking carries more risk and offers smaller gaming gains than GPU overclocking at equivalent effort.
Common Mistakes That Kill Gaming Performance (And How to Avoid Them)
Most gaming PC performance problems trace back to a handful of recurring errors. Recognizing them before building saves money, time, and frustration.
Ignoring the CPU-GPU Balance (Bottlenecking)
Pairing a flagship GPU with a budget quad-core CPU creates a severe bottleneck. The GPU sits idle waiting for the CPU to generate draw calls, and FPS tanks — especially at lower resolutions. Use a bottleneck calculator during planning, and ensure CPU and GPU tiers are within one generation of each other.
Underspeccing the PSU
Builders frequently calculate exact power draw and buy a PSU that matches it precisely. Under sustained gaming load with power spikes, this leaves zero headroom. A PSU running at 90%+ capacity runs hot, degrades faster, and can cause random shutdowns that look like software bugs. Buy 20–30% more wattage than you think you need.
Skipping RAM Speed Enablement
This is the most common and invisible performance loss. DDR5 kits ship in a slow JEDEC default state. Without enabling XMP/EXPO in BIOS, you're gaming on effectively downgraded RAM. Five minutes in BIOS settings recovers the performance you paid for.
Poor Case Airflow
Thermal throttling is silent and devastating. When a GPU or CPU exceeds its temperature limit, it reduces clock speeds automatically — you see lower FPS with no obvious cause. Plan a front-intake, rear/top-exhaust airflow path. Three intake fans and two exhaust fans is a solid baseline for most mid-tower cases.
Frequently Asked Questions
What is the most important component in a gaming PC for performance?
The GPU is the most important component for gaming performance. It handles rendering, frame generation, and visual output — and upgrading the GPU produces the largest FPS gains of any single component change in most gaming scenarios.
How much RAM do I need for a high-performance gaming PC in 2026?
32GB of DDR5 RAM in a dual-channel configuration is the recommended baseline for high-performance gaming in 2026. 16GB is workable but increasingly limiting in memory-heavy titles, while 64GB offers no meaningful gaming benefit over 32GB for most players.
Does CPU matter as much as GPU for gaming?
The CPU matters significantly, but less than the GPU in most gaming scenarios. At 1080p with high refresh rates, CPU performance has more impact because the GPU finishes frames faster and waits on the processor. At 1440p and 4K, the GPU becomes the clear limiting factor in the majority of titles.
How do I know if my components are bottlenecking each other?
Monitor GPU and CPU utilization simultaneously during gameplay using HWiNFO64 or MSI Afterburner. If your GPU is at 99% utilization and CPU is below 60%, the GPU is the limit (normal and acceptable). If CPU is at 99% and GPU is well below 90%, you have a CPU bottleneck that's suppressing your frame rate.
Is overclocking worth it for gaming performance?
RAM overclocking via XMP/EXPO is absolutely worth it — it's safe, easy, and recovers performance you already paid for. GPU overclocking is worth it for enthusiasts willing to spend time testing stability, offering 5–10% gains. CPU overclocking provides smaller gaming returns relative to the effort and risk involved, and is generally optional for most builders.